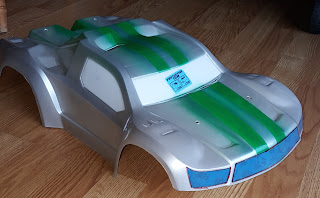
 So I started out with taping the body up in prep for paint. I use blue painters tape to make stripes. It is sometimes hard to make the line perfectly straight when they go over uneven surfaces. I usually just add extra tape in those areas.
Here is a overhead shot of the tape. You can see that its not very straight or consistent. I always try just try my best and then lay down some paint. No one can ever tell you that you painted incorrectly because it is your self expression! Painting bodies if my favorite part!
Just another shot from the side. I like to block out the grill and headlight in order to make a face. I like my truck to have personality.
After laying down about 10 thin coats of FasPearl Silver, I backed it with three coats of Faskolor white. It turns out I didnt add enough coats because I got some bleeding when I started painting the green. I should have painted the green first, since it was darker, in order to avoid the bleeding but that takes a lot more masking and time. Next time I will do 10 coats of white backing!!
Here is another shot showing the light coat of green I laid down. I ended up doing about 6 coats of green. After the green was painted, I again backed the entire with 3 coats of white so that the colors really popped.
Here is another close up of the light coats of green.
Here is a shot after I completed all the coats of green and the white backing. you can see the bleeding that occurred. Its all good though, I will run it!

This is another shot of the stripes going all the way back.
 After I was done with the green, I decided to make an orange face on the front! I always like painting orange because it really catches the eye. After the paint is done drying, I like to pack everything with white Rustoleum Protective Enamel.
This is a shot of the body after the first coat of protective enamel.
 Here is another shot from the front after all the paint was finished drying. You will notice how different angles in the sun makes the paint change color. after two light coats of orange, I did a light coat of peal white. I then followed with several more coats of orange.
Overall I am super happy with with the new body. The pre cut was super helpful in cutting down on the amount of time it takes to prep and paint a body. All the vent holes are already cut out as well which is super nice. So far the body has performed exceptionally well, taking some major beatings and not parachuting anywhere!
Good luck at the races! Remember, you can always ask me for help, just look for the Pro-Line gear and the KLA logo at the track.
-Matthew Garcia


No comments:
Post a Comment